Showing posts with label Gift Ideas. Show all posts

05 June, 2012

Vintage style aprons for Mother's Day

Well, as mentioned in a previous post, sometimes life is not ideal... hence my lack of posting over the last few months. Anyway, I have been doing a little bit of creating and today I want to show you one of my projects that I am particularly excited about. This project has been in the works for about 8 months and was finally completed the day before Mother's day (nothing like a deadline hey?!?! ;)

My mother in law loves has 6 grandchildren, 2 boys and 4 girls. She is really involved with them all and loves to cook. So I decided to make her a set of aprons, 1 for her and 1 for each of her grand-daughters (sorry for all you feminists out there, I didn't make any for the boys... when you see the amount of work in each apron you'll understand why ;)

I wanted to make each of the girls aprons slightly different so was uncontrollably excited when I found a panel of fabric which depicted different girls baking different goodies. This panel became my inspiration for the project.

Anyway... here they are...

All 5 aprons... looking pretty...

Here's an individual pic of one of the girls' aprons. All the aprons are lined. The lining fabric is the same as the pocket fabric.
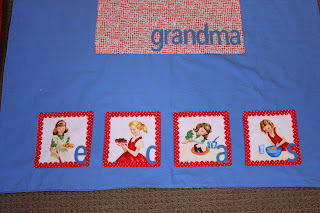
Here's Grandma's apron. Her lining fabric is also the same as her pocket fabric. I put the same pics of the girls as I have used on their individual aprons and added their initials for something sentimental.


Ok, onto the finer detail...

Each letter, yep you heard right, EACH letter, has been embroidered around using a blanket stitch (i'm pretty sure it's not called that, but I can't remember the correct name). One of the reasons I took such a long time on these aprons is because my Mother in law taught me to embroider and so I knew that she would LOVE to see my new skill in use.
Here are some close ups of the girls pictures and names...


So there you have it... a project that really truly was a labour of love! It took a really long time, but I am super happy with the result! :) And the great thing, my Mother in law is displaying them in her kitchen! :) :) :)

That's all!

Kerryn
01 February, 2012

Crayon Roll For A Special Friend

We've just been to the party of one of Lachie's precious little friends and wanted to make her something special for her birthday. She loves art and craft so I thought I'd go with a crayon roll. I've never made one before and love trying new things. After looking at a few images of crayon rolls I was pretty confident that I could design it myself. It was a reasonably simple project but involved LOTS of precise measuring, so took a lot longer than I originally thought it would.

Anyway, totally worth it... :)

Here it is...


I made a little felt back rose and hot glued it to the elastic for a bit of extra decoration.

Each crayon/pencil has it's own little spot. so precise and organised. ;)
 That's it for today and hopefully I can start sewing for myself now that the January madness is over!! ;)

Kerryn

18 January, 2012

Baby shower gift # 2

So here's the gift for the second baby shower I went to this weekend...
This little lady is Nellie. ;) I also made a matching bib and card. 

I wanted to make something to give to my friend that was just for her... not for the baby. So I made her some little earrings and put them in this little cute pouch.
The earrings were the aqua ones in this pic. :)
There you go... baby shower gift #2... complete!! :)

Short and sweet! ;)

Kerryn

17 January, 2012

Baby shower gift # 1... Betsie & coordinating gifts

Yesterday I shared some pics of my two new friends, Betsie and Nelly. Here's a pic of the other gifts that went with Betsie.


I made a matching bib and fabric covered journal to go with Betsie. I will be printing out the photos I took at the baby shower for my friend to stick in the journal and then she can use it to jot down all the babies milestones.

You may notice that Betsie only has one ear... Hmmm... I had to sew the second ear on at my friends house while I was setting up for the shower... But... I left the ear at home!!!! AHHHH!!! Soooo... I wrapped Betsie up and had to explain in front of a room full of ladies that Betsie's other ear was inconveniently back at my place... hahahaha... not to worry... :) Oh the joys of handmaking gifts. :)

Stay tuned for the second baby shower gift. :)

Kerryn

16 January, 2012

Introducing... Nelly and Betsie

I have two new little friends to introduce you to. These little ladies came to life over the last week and have been named Nelly and Betsie. Nelly and Betsie were made for two special ladies who had baby showers over the weekend. I co-hosted one of the baby showers and attended the others.

So, let me introduce you to my two new little friends...

Here they are Betsie on the left and Nelly on the right. :)
Betsie enjoys quiet cuddles, long romps in the jungle & quick splashes in river. Nelly likes listening to R&B, salsa dancing & short skirts. 


I hope you've enjoyed meeting Nelly and Betsie, I also made a few matching gifts to go with them, I'll post some extra pics of the matching gifts over the next few days. :)

That's all,

Kerryn

05 January, 2012

Handmake Christmas 2011, gift 11... piece de resistance!!

As the post name suggests I am particularly happy with this last Christmas gift. It was dreamt up a number of months ago and was for my Mum. My Mum lives on a large property and LOVES to garden. She uses a wheelbarrow to transport lots of tools, manure, compost, wood chip etc. She's a very organised person and so the idea of her heaping everything into the one wheelbarrow just doesn't sit right with me. So I decided to to make her a 'wheelbarrow caddy'. I wanted something to hook over the handles of her wheelbarrow that she could store all her tools in, as well as her phone, water bottle and gloves. I wanted to choose a fabric that was both waterproof and hardy, so I chose some oilcloth. I had never used oilcloth before and have to say that it is a little tricky to work with, but I got there in the end. I got some great tips from this website.

So I designed the 'wheelbarrow caddy'. It has two sides to use all available space and the straps loop over the handles of the wheelbarrow and will have a snap closure.

Introducing... the 'wheelbarrow caddy'...


I also added some embellishment to a new set of her favourite gloves for a giggle. :) P.S Please ignore the horribly dirty table that I have stupidly taken all the photographs on... ;)
 
This side stores her phone, water bottle, gloves and has a large section for other miscellaneous stuff.

This side stores her 3 favourite gardening tools. 


So, there it is. I don't have a pic of it in action yet, but will get one and post it when I can. :)

Ok, that's it!! That's all 11 Christmas gifts done... phew... it was quite an effort... now to put my feet up and relax... NOT! I've got 2 baby showers and a gazillion birthdays in January. Not to mention the skirt and 2 dresses that I want to make myself!! back to the sewing machine I go... ;)

See ya...

Kerryn

04 January, 2012

Handmake Christmas 2011 - Gift 8,9 & 10... PJ pants

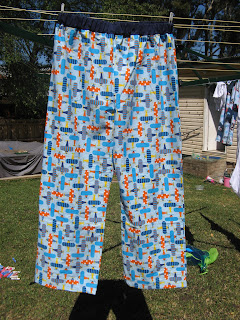
I know I've already posted about these fun men's PJ pants before, but I thought I give you a quick review. I made these for the special men in my family. They are super fun and each fabric was chosen specifically for the recipient. They were very well received. :)


I know this is a big call, but I am pretty confident in saying that this is my favourite fabric of all time! 80's mixed tapes!!! AWESOME!!!
It's a bit tricky to see but this is pac man fabric... ummmm... awesome!! :)

organic cotton featuring some super bright planes

I absolutely LOVE all the fabrics, they are super fun!! Most of the time it's only the ladies that get handmade goods... so it was fun spending some time on the boys!!

Tomorrow is the last of my Christmas gifts and I've left one of my favourites till last. ;)

Till then, happy crafting!

Kerryn

03 January, 2012

Handmake Christmas 2011, Gift 7... dress up clothes on steroids...

Ok, I know this post has a slightly weird name, but let me explain... I wanted to make my little 3 year old niece some dress up clothes for her Christmas gift. I had seen this absolutely divine dress from the icandy handmade blog. It was stuck in my mind as one of the most beautiful dresses I had ever seen. I wanted to take the gorgeous petal design, use some fabulous, sparkly fabric add a sash, wand and crown... and... tada... whip up some awesome kids dress up clothes!!

Problem... the skirt took FOREVER!!!!!!!!!!!!!!!! Once I'd finished the skirt and attached it to the tshirt (bought from target) I simply didn't have the time for the wand and crown. So it's halfway between dress up clothes and halfway between party clothes. I've affectionately named the outfit 'dress up clothes on steroids'.

Ok, blah blah blah... here it is...

without the sash
the shiny little petal skirt

pretty little flower on the tshirt

So, there it is... :)

I did a little, girly squeal when it all came together. I really enjoyed making something a little bit fun for my niece. So often we dress our kids in serious, adult style clothing. So this outfit is just for fun! :) And who knows... I might get the crown and wand made one day. :)

Until tomorrow...

Kerryn

02 January, 2012

Handmake Christmas 2011 - Gift 6... the last handbag!!

Ok, ok... so I made a few handbags. I've been sewing less than a year and handbags are something that I feel are lovely gifts, can be matched to the different tastes/personalities of each recipient and are achievable for a beginner like me. :)

This one was for my Mother-in-law. I nearly fell over when I saw the fabric.  Have you every had one of those 'gift finding' moments where you just want to scream "IT. IS. SO. PERFECT!!!!!" and then run to the counter and buy it, no matter the cost??? No??? Well, I have! When I walked past this gorgeous decorator weight fabric and saw the beautiful black and caramel stripes I knew it was for her and then i opened up the bolt of fabric and noticed that it had a wide decorative edge... I nearly fell over, the colours were perfect for her! So, the decorative edge became the lining for her bag. PER-FEC-TION!!!

Ok, before I get too carried away...

here it is...


Hello gorgeous lining fabric!! Could you be any more perfect?!?!?

So... there it is... the last of my Christmas handbags...

Stay tuned for more handmade goodness tomorrow.

Kerryn

24 November, 2011

Handmake Christmas 2011 - fingerprint cufflinks

Hi!! I love making gifts for people with my kids. I would love to teach them the art of gift making and gift giving. So each birthday/Mother's day/Father's Day/Christmas we get stuck in to the gift making. Yesterday we made some little fingerprint discs out of polymer clay (PC or fimo here in Australia). I had been planning on making these for a while and attaching them to some cuff link bases that I had bought from Etsy. Well they arrived and so we pulled out the PC and got going. I took a few photos of the process so thought I'd write a quick tutorial in case you'd like to make them with your kids. :) The kids will be giving them to some of the special men in their lives as little Christmas gifts. :)

So... here they are...


So, start by mixing your favourite colour polymer clay (PC) with some white. In the past I have found that if you do not mix it with white then it cracks and loses definition when you bake it. Perhaps that's just that brand I use??? Anyway, I always mix my coloured PC with white. It's pretty tough to start off with, so it'll take some time to make it malleable. When I'm making multiple finger pint discs I start off with a large ball of PC and divide into even portions so that all the discs are the same colour.


Once you've completely mixed the colours together divide evenly into the number of discs you need and roll them into balls.


Now place the balls in between 2 layers of baking paper and use a book to press flat. Using the baking paper and book make sure the disc is even and smooth with none of your fingerprints all over it.
Next step is to get your little one's finger and firmly press it into the PC disc. You will need to use a bit of pressure as the PC is still quite firm.


Now get out your cake skewer and etch your child's name into the PC along with the year. Don't be too picky... the etching can look a bit 'rustic' ;). Next pop them in the oven for the time mentioned on your PC pack. Mine is 130 deg Celsius for 30min.


Now get out you cuff link bases and hot glue gun.


I found the best way was to glue directly onto the back of the disc and then quickly attach it to the cuff link base.


TADA...


Such a cute little gift. Yes the etching is a little rustic but hey... I think they're cute. :)


Have fun!

Kerryn