16 June, 2012

What to do when there's SO. MUCH. RAIN?!?

Well we've had LOTS of rain lately and I'm a little... actually a lot over it!! But it has given me heaps of opportunity to crack out my newest sewing project. I made the kids raincoats this year. :) Why bother, I hear you ask?!? Good question... Let me fill you in... I HATE regular kids raincoats! The plastic fabric is so thick and uncomfortable and YUK! One day while I was online I stumbled upon laminated cotton. Laminated cotton is 100% cotton (normally quilting weight) with a thin coating of plastic on the outside for waterproofing. Because the layer of plastic is quite thin the fabric is still quite soft, just a bit stiffer than a regular cotton. It's gorgeous! So after my research I decided to give it a shot. I bought some online from this Etsy store. When it turned up I squealed with joy... it was so beautiful!

Anyway, here are the raincoats... Lachie chose his fabric...

The hood has a cotton lining, but the rest of the coat is unlined.


How sweet is Adele's coat! :)


I LOVE this pic... in less that a second I was about to get VERY wet! :)

The next day (still raining) Tim made little origami boats with Lachie in the morning while Adele...

coloured in her face ;)

then we got rugged up...

and set sail....

down the river drain ;)
If you are thinking of making any of your own here are 3 things I have learnt from this project...

1) because the bottom layer of the fabric is cotton, the coat takes a lot longer to dry than a regular plastic only raincoat as the cotton soaks up the water. The cotton doesn't get too wet when just using it to walk in the rain but it does get wet when the kids jump in puddles.
2) I probably wouldn't choose a white fabric again. Because the kids jump in muddy puddles and end up sitting in mud and doing all sorts of muddy activities in the rain the cotton soaks up the dirt. You don't notice with Lachie's because it is brown but Adele's shows every single piece of dirt. I always handwash them but it's hard to get the dirt out.
3) It's not a super quick project (at least not for a beginner like me) the fabric was a bit tricky to work with.

Anyway, I am super happy with how they have turned out!! And a massive thanks to my friend Leigh who put in the snaps for me with her handing snap press! Thanks Leigh!! ;)

Kerryn

10 June, 2012

Lachie's 4th party

When Lachie turned 4 I promised myself that I would just do a super simple party... NO decorations, easy catering (actually, that's pretty normal for me... I'm not much into cooking), NO crazy amount of sewing or crafty stuff!!! BUT... I just had to slip a few things in... ;)

Here is some super easy felt bunting I made for the party. It was really simple to make. I used one row of stitching at the top to create a casing, then used some cord to slip through the top of each piece and then tied a knot in between each piece to stop it sliding together and bunching up. I love how clean and fresh it looks. :)
the all important food table :)

The invites

I made some lego frames to decorate the food table with. I used one of them to frame the 'menu' that Lachie had chosen. :)

I also made some fondant letters and numbers. I used maybe about one tenth of the ones made... estimation FAIL!!!

more frames

Lachie wanted some "huuuuge biscuits" at his party. It's hard to see by these photos but they are actually the size of a small child's head!! ;)

The obligatory fairy bread pic!

He wanted a "black cake with smarties". Sweeet... how easy is that!?!?! I plonked the cake on a lego board and got Tim to write "Lachie" in lego (yes, I'm a bit 'challenged' when it comes to lego creations).

Lastly, a pic of my precious boy!! :)
Ok, that's all!

Kerryn

07 June, 2012

Adele's winter warmers, jacket # 2 and some Easter baskets

Wow, after a 2 month break from blogging I am on a roll. :) It feels so rewarding to be looking through all the pics of stuff that I have made over the last few months.

Anyway, here is the second jacket that I have made for Adele. It is a fully lined jacket and was made with the same pattern that I made for this jacket. It was a fun experience working out how to make it fully lined. :) I also made it belted. I really wanted to find a gorgeous vintage gold button for the jacket but could only find really ugly shiny ones, so I got angry and used a bright orange button instead... yeah, go figure. Not one of my most creatively inspired moments ;) I'll probably change the button when I find a nice vintage-y one.

So here's the jacket...

The outer fabric is navy velvet


This is another little project I made over Easter. We used these for an egg hunt with our kids and their cousins. I made 6 in total. I've never used felt on a project like this and absolutely loved it! They came together so quickly! I love that you don't need to worry about finishing seams!! :)
My boy, enjoying some chocolate goods! :)
 Till next time,

Kerryn

06 June, 2012

Adele's winter warmers, jacket # 1

Over the last few months I have been sewing a few bits and pieces to add to Adele's winter wardrobe. We are trying to save money where we can and I have lots of fabric stashed away, so it made sense to try and sew some of the more expensive pieces and just buy the basics.  I haven't managed to sew as much as I wanted... but winter has only just begun... so there's still hope... right?!?!?! ;)

Anyway, I made the pattern for this little jacket and was super happy with the way it turned out. I have only just got the hang of bias binding and so this project was a great chance for me to practice with my new found skills. I am not disappointed... I now LOVE bias binding!! :)

Anyway, here's the jacket (and my sweet girl).


My baby LOVES shoes! I'm not sure what was so funny about this one though! ;)


Hope you like it! I do. :)

Kerryn

05 June, 2012

Vintage style aprons for Mother's Day

Well, as mentioned in a previous post, sometimes life is not ideal... hence my lack of posting over the last few months. Anyway, I have been doing a little bit of creating and today I want to show you one of my projects that I am particularly excited about. This project has been in the works for about 8 months and was finally completed the day before Mother's day (nothing like a deadline hey?!?! ;)

My mother in law loves has 6 grandchildren, 2 boys and 4 girls. She is really involved with them all and loves to cook. So I decided to make her a set of aprons, 1 for her and 1 for each of her grand-daughters (sorry for all you feminists out there, I didn't make any for the boys... when you see the amount of work in each apron you'll understand why ;)

I wanted to make each of the girls aprons slightly different so was uncontrollably excited when I found a panel of fabric which depicted different girls baking different goodies. This panel became my inspiration for the project.

Anyway... here they are...

All 5 aprons... looking pretty...

Here's an individual pic of one of the girls' aprons. All the aprons are lined. The lining fabric is the same as the pocket fabric.
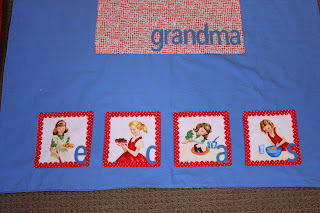
Here's Grandma's apron. Her lining fabric is also the same as her pocket fabric. I put the same pics of the girls as I have used on their individual aprons and added their initials for something sentimental.


Ok, onto the finer detail...

Each letter, yep you heard right, EACH letter, has been embroidered around using a blanket stitch (i'm pretty sure it's not called that, but I can't remember the correct name). One of the reasons I took such a long time on these aprons is because my Mother in law taught me to embroider and so I knew that she would LOVE to see my new skill in use.
Here are some close ups of the girls pictures and names...


So there you have it... a project that really truly was a labour of love! It took a really long time, but I am super happy with the result! :) And the great thing, my Mother in law is displaying them in her kitchen! :) :) :)

That's all!

Kerryn